
Joomla 3.0 is recommended for more experienced users and developers. It includes cutting edge features.
Download Joomla! 3.0.x (Recommended for developers and early adopters)
Categories: កូនជាទីស្រលាញ់
Leave a comment
គន្លឹះធ្វើឲ្យពុម្ពអក្សរយូនីកូដខ្មែរ Kh ដើរបានល្អនៅលើកំណែ CS5 នៃ Photoshop, Illustrator និង InDesign
ពុម្ពអក្សរ យូនីកូដខ្មែរ ជាប្រភេទពុម្ពអក្សរ Open Type ដែលអាចដើរបានក្នុងកម្មវិធីរចនាមួយចំនួនដែលស្គាល់ប្រភេទអក្សរ Open Type ដូចជា Photoshop, Illustrator និង InDesign ជាដើម។ ម្យ៉ាងវិញទៀតកម្មវិធីទាំងបីនេះ Photoshop, Illustrator និង InDesign ក្នុងកំណែ CS5នេះ មានបញ្ហាជាមួយដំណើរការអក្សរយូនីកូដខ្មែរ គ្រួសារ Kh។ ដូច្នេះដើម្បីដោះស្រាយនោះ សូមអនុវត្តតាមការណែនាំដូចខាងក្រោមនេះ។ Continue reading
Categories: កូនជាទីស្រលាញ់
Leave a comment
Using VirtualBox 4 in openSUSE (openSUSE Host, Windows XP and Windows 7 Guests)
This is page 3 of this article. Please see page 1 first. This section assumes you have followed that info!
Step 1 – Install VirtualBox.
There are 2 ways to do this:
– Install from YaST. The repos are here: http://download.opensuse.org/repositories/Virtualization/
You can also add the official VirtualBox repos to YaST. See the bottom of this page. This is my preferred method.
– Download the 3 files you need from VirtualBox (see page 1) and install them.
(Install note – See this thread in the openSUSE Forums if you are having issues) Continue reading
VirtualBox Under Windows
This is page 2 of this article. Please see page 1 first. This section assumes you have followed that info!
Step 1 – Install VirtualBox.
Step 2 – Install VirtualBox Extension Pack.
Step 3 – Open VirtualBox. We are going to create our first Virtual Machine.
Click on New

Click the Next button

Pick a name, The OS, and the version. Then click the Next button.

Decide on how much memory you want to give the host OS. The more memory you give the better your Guest OS will run.
Click the Next button.

For a new install you will Create new hard disk.
VirtualBox seems to choose 8GB as default for most Linux distros. I recommend at least 10GB.
Click the Next button.

The Create New Virtual Disk Wizard comes up. Click the Next button.

I recommend using Dynamically expanding storage if space is at all a consideration.
Fixed-size is OK if not. Click the Next button.

Here is where many folks get in to trouble, having to resize a disk when space becomes an issue for the Guest OS.
For testing this usually isn’t an issue.
If you are going to keep this OS around, make this as big as you can afford to without going overboard.
Linux distros are pretty compact compared to Windows Vista & 7.
In this section you can choose an alternate location to store your VM.
Click the Next button when you’re finished.

Everything look as you had intended? Click on the Finish button.

Everything look as you had intended? Click on the Finish button

Don’t click Start yet! We’ve got some more work to do. Click the Settings button.

We started out in the General section. Click on System.

Configure your Boot Order. For install CD/DVD-Rom should be first. Unless you need F6 drivers you don’t need a floppy.
Select your Chipset next. As of this writing ICH9 is new.
If you intend on letting the Guest OS access multiple more than one CPU/Core then you need to Enable I/O APIC.
UTC Time. I don’t understand the obsession of trying to screw with my clock. I don’t care what time it is somewhere else.
Uncheck this and it’ll stick with the time on your computer.
Click on the Processor tab when you are done with this section.

Adjust the number of processors/cores you want available to the Guest OS.
PAE/NX – Here is what the VB manual says:
“In addition, the “Enable PAE/NX” setting determines whether the PAE and NX capabilities of the host CPU will be exposed to the virtual machine.
PAE stands for “Physical Address Extension”.
Normally, if enabled and supported by the operating system, then even a 32-bit x86 CPU can access more than 4 GB of RAM.”
Well, this setting is actually more than that (Google / Wiki it). My preference is to enable this on newer hardware.
When you’re through with this section, click on Display.

Adjust your Video Memory. If you have a video card with 256MB or more memory then crank it up!
Extended features – For Linux Guest OS I leave these unchecked.
Click on Storage when you are through here.

Add the ISO you downloaded to the IDE controller.
If you are going to install from CD/DVD then leave an empty CD drive.
You can configure the controller type on the right side of the screen.
*note for screen below. If the OS you are going to install installs Guest Additions automatically you don’t need
mount the VBoxGuestEditions iso. openSUSE installs it by default (virtualbox-guest-tools).

The SATA Controller:
-You need to have Use host I/O cache enabled.
-To use XP as a Guest OS you may need F6 drivers. These are Intel RST drivers (text mode).
-If your .vdi file is on the IDE Controller and you want it on the SATA controller.
1 – Create an SATA Controller if one isn’t there (below the Storage Tree box).
2 – Delete the .vdi drive under the IDE Controller.
3 – Add the .vdi drive under the SATA Controller.
When you are through with this section click the OK button.

Click the Start button to get rolling!

If your guest OS doesn’t install Guest Editions by default then install it after you update that OS.
Google search it if you don’t know how. For example:
http://www.google.com/#sclient=psy&hl=en&q=ubuntu+10.10+virtualbox+guest+additions&aq=1&aqi=g5&aql=&oq=&pbx=1&fp=d9008d84f286047
From the command line, open or cd to the location where the iso is (sudo or su): su ./VBoxLinuxAdditions.run
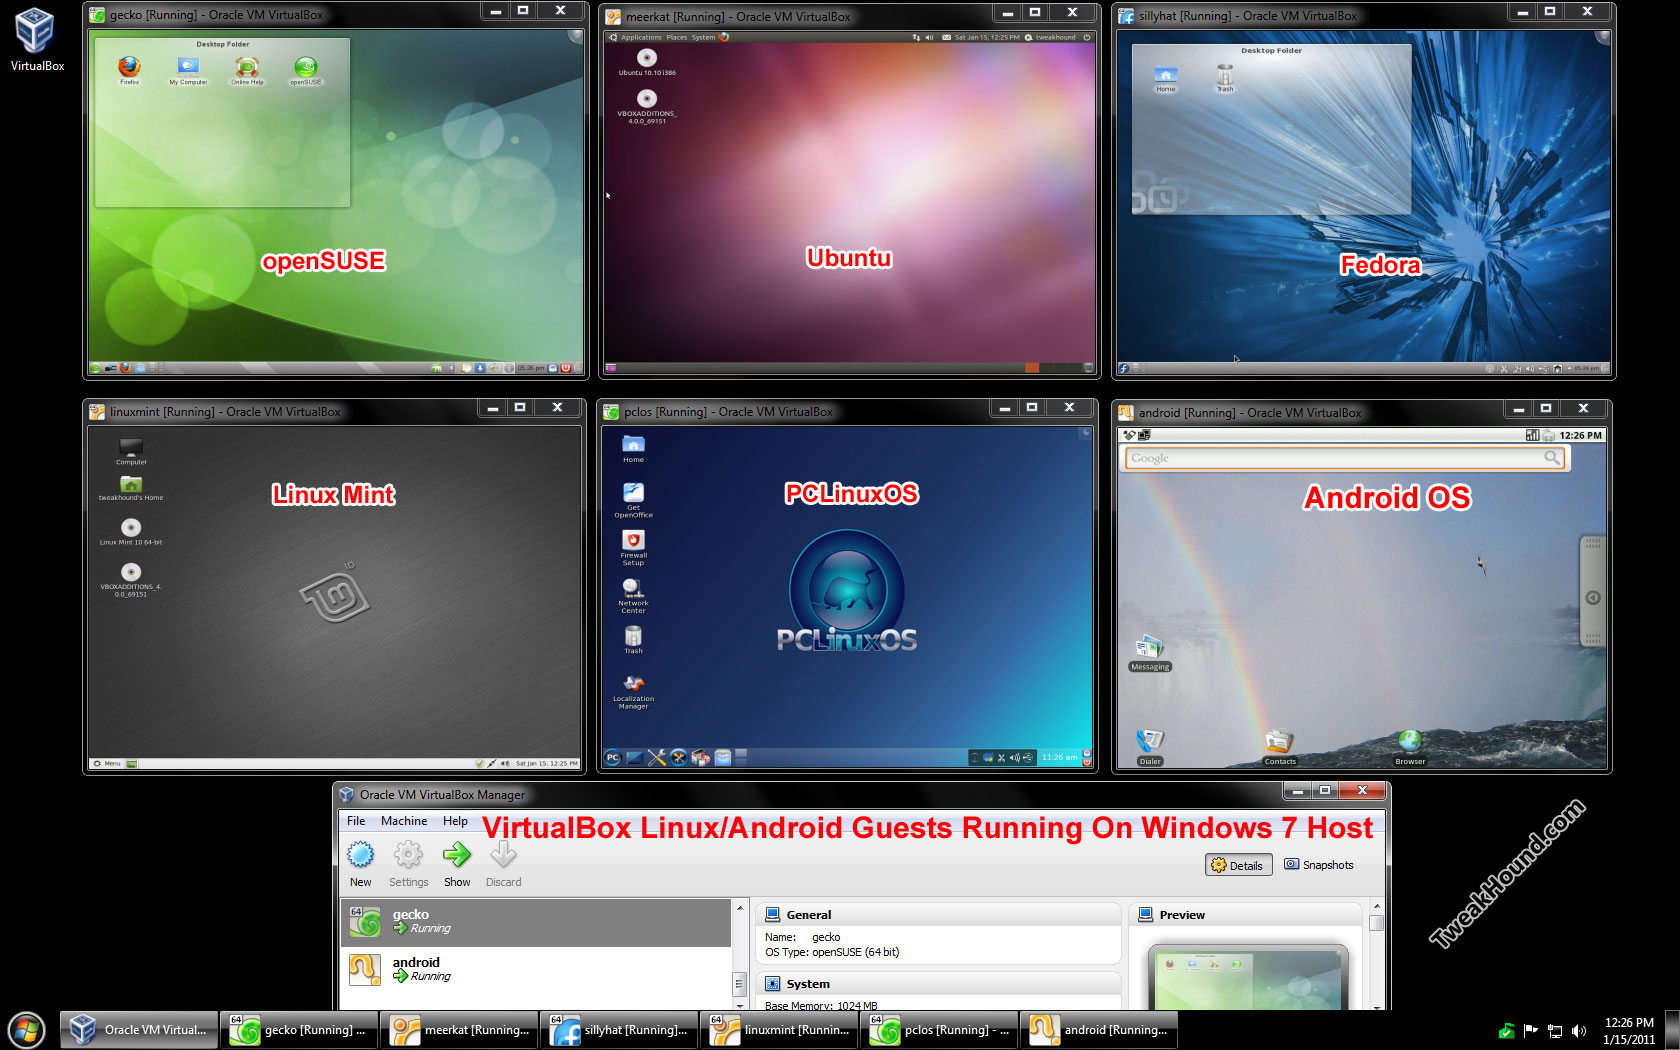
An example of 6 different VM’s running under Windows 7. Click the picture for a larger image.
Print comments at the end of your Excel worksheet
If notes in your Excel table are informative and their contents are clear even isolated from the commented cell, you can easily get them to paper at the end of the page. It’s also better to print cell notes below the rest of the data if they overlap important details when displayed. It’s doesn’t involve any copying and pasting, just follow the steps below: Continue reading
Categories: កូនជាទីស្រលាញ់
Leave a comment
Virtual Labs System Requirements
MSDN and TechNet virtual labs are hosted using a hybrid cloud consisting of Windows Server Hyper-V and Windows Azure. Launching these labs will start a client application based on .NET. Detailed system requirements are listed below.
Read below for the full list of system requirements or use this link to check your system requirements. For support, email support@holsystems.com. Continue reading
Categories: កុំព្យូទ័រ
Leave a comment
Microsoft Office Pro Plus 2013 SP1 x64 En,Ar,De,Fr. July 2014

A new release of Microsoft Office 2013 has received an updated interface, became more social. It is optimized to work with touch and gestures, stylus, mouse and keyboard, so it supports all the Continue reading
Categories: កុំព្យូទ័រ
Leave a comment
ណែនាំដំឡើង WORDPRESS នៅលើ localhost សម្រាប់ធ្វើ website ឬ blog ដោយខ្លួនឯង

តើអ្នកមានដឹងទេថា website ឬ blog ក្នុងប៉ុន្មានឆ្នាំនេះមានការរីកចំរើនយ៉ាងខ្លាំង ជាពិសេសនៅប្រទេសកម្ពុជាយើង។ ហេតុអ្វីបានជាគេចូលចិត្តបង្កើតវាម្លេះ? នេះក៏ដោយសារការចង់ចែករំលែកចំនេះដឹងឬបទពិសោធន៍របស់គេទៅអ្នក ទាំងអស់គ្នា និងជាពិសេសវាក៏អាចរកប្រាក់ចំណូលបានផងដែរប្រសិនបើ website ឬ blog របស់អ្នកល្បីឈ្មោះមានគេចូលមើលច្រើននោះ។ មុននឹងឈានទៅដល់ការបង្ហោះ website ឬ blog អោយ online នោះវាចាំបាច់ណាស់ក្នុងការបង្កើតវានៅលើ local computer របស់យើងសិន។ itkhmer នឹងបង្ហាញអ្នកនូវកម្មវិធីមួយងាយស្រួលដំឡើងកម្មវិធីតម្រូវការមុន នឹងអាចដំឡើងប្រើ CMS web ដូចជា wordpress, joomla, drupal គឺ xampp។ អ្នកត្រូវដំឡើងវាសិនមុននឹងដំឡើង wordpress។
- ដំឡើង xampp: ទាញយក xampp មុននឹងដំឡើងអ្នកមិនត្រូវបើក Skype នោះទេ ឬក៏កម្មវិធីណាដែលប្រើ port 80។ Double click លើវារួចដំឡើងនៅក្នុងចំណែកថាស C។
- បង្កើត database: ក្រោយពីរួចហើយ ចុចបើក xampp ដោយសិទ្ធិ Admin (Right click run as Administrator) កម្មវិធីនឹងលេចមកដូចរូបខាងក្រោម ហើយចុច Start ត្រង់បន្ទាត់ Apache និង MySQL ដើម្បីបើកប្រើសេវាកម្មរបស់វា។


ចុចត្រង់ phpMyAdmin ដូចក្នុងរូប

ចុចលើ Tab Database រួចបំពេញឈ្មោះទិន្ន័យដែលអ្នកចង់បង្កើត និងរើសយក utf8_unicode_ci បន្ទាប់មកចុចលើប៊ូតុង Create។

នៅផ្នែកខាងឆ្វេងចុចលើឈ្មោះទិន្ន័យដែលអ្នកទើបបានបង្កើតរួច ហើយនៅខាងស្ដាំចុចលើ tab Privileges រួចបំពេញឈ្មោះក៏ដូចជាពាក្យសំងាត់អ្នកប្រើ ចុច Generate និងរើសយកប្រអប់ Grant all privileges… ទើបចុច GO នៅខាងក្រោម។
3. បង្កើត virtual host នៅក្នុង xampp
បើសិនជាអ្នកមិនចង់ប្រើទំរង់ localhost រួច url នោះទេ គឺវាយជាឈ្មោះ website តែម្ដងដូចជាwww.itkhmer.net នៅក្នុង localhost របស់អ្នកនោះត្រូវធ្វើដូចខាងក្រោម៖
ចូលទៅបើក file “httpd-vhosts.conf” នៅកន្លែងដែលបានដំឡើង xampp “C:\xampp\apache\conf\extra” សន្មត់ថាយើងចង់ដំឡើង wordpress នៅក្នុងចំណែកថាស C និងប្រើឈ្មោះតំបន់ itkhmer.net (ត្រូវទាញយក wordpress រួច extract វាទៅក្នុងចំណែក C: រួចប្ដូរឈ្មោះ folder ពី wordpress ទៅ itkhmer.net)។ មុននឹងធ្វើការកែ file “httpd-vhosts.conf” អ្នកត្រូវ backup វាទុកសិន ក្រោយមកបើកវារួចស្វែងរកនិងលុបសញ្ញា # ពីមុខ NameVirtualHost *:80
NameVirtualHost *:80
បន្ទាប់មកបន្ថែមឃ្លាដូចខាងក្រោម៖
<VirtualHost *:80>
ServerAdmin webmaster@itkhmer.net
DocumentRoot “C:/itkhmer.net”
ServerName itkhmer.net
ServerAlias www.itkhmer.net
ErrorLog “logs/itkhmer.net-error.log”
CustomLog “logs/itkhmer.net-access.log” common
<Directory “C:/itkhmer.net”>
Options All
AllowOverride All
Order Allow,Deny
Allow from all
Require all granted
</Directory>
</VirtualHost>
ក្រោយមកត្រូវ Save វាទុក។
អ្នកត្រូវបើក Notepad ដូច Right click Run as Administrator ហើយចូកទៅបើក file hosts នៅក្នុងទីតាំង “System32\drivers\etc” រួចបន្ថែមឃ្លាខាងក្រោម ហើយ save វា៖
127.0.0.1 itkhmer.net www.itkhmer.net
4. ដំឡើង wordpress ក្នុង localhost តាម xampp:
ចូលទៅបើក xampp ជាលក្ខណៈ Administrator ហើយបើក Mozilla firefox មក រួចវាយ itkhmer.net ដែលជាឈ្មោះ website អ្នកចង់ប្រើ រួចចុចត្រង់ Create a Configuration File

ហើយចុច Let’s go!

បំពេញព័ត៌មាន database ដែលអ្នកបានបង្កើតខាងលើរួចចុច Submit

បន្ទាប់មកចុច Run the install

បំពេញឈ្មោះ site របស់អ្នកនិង username password សម្រាប់ login ចូល wordpress ហើយចុច Install WordPress

បើសិនជាមិនមានបញ្ហាអ្វីនោះទេវានឹងលោតផ្ទាំងប្រាប់ថាបានជោគជ័យ ដែលបញ្ជាក់ថាអ្នកអាចចូលទៅប្រើវាបាន។


ខាងក្រោមនេះគឺជា backend (admin panel) របស់ wordpress ដែលអ្នកអោយអ្នកបង្កើត Menu, Article, Page, Category របស់ website អ្នកក៏អាចប្ដូរ Themes ឬបន្ថែម Plugin ផ្សេងៗបានផងដែរ។

ហើយនេះគឺវាទំរង់ Website ក្រោយពីដំឡើងរួច

ជូនពរអ្នកទទួលបានជោគជ័យ!
Categories: កុំព្យូទ័រ
Leave a comment
Handy Hints For Windows 8.1
So by now you’ve had plenty of time to play around with Windows 8.1 and get to grips with the customisable start screen, new and improved apps and the fact that OneDrive weaves itself throughout the operating system. Plus you’ve probably breathed a sigh of relief that the Start button was finally put back. There were so many new features and tweeks built into Windows 8.1 that it is easy to miss them, so here is a quick guide to some of the best additions. Continue reading
Categories: កុំព្យូទ័រ
Leave a comment
Better Than the Real Thing? 5 Popular Ubuntu Based Distros
Ubuntu might well be the world’s most widely used flavour of Linux distribution, but whether it’s the best remains a hotly contested, hugely contentious topic.
Obviously, with a name like ours above the door, we’re a little biased, but we’re not blind; many of you, our regular readers, prefer to use other Linux distributions for a variety of reasons. Some are championed because they use something other than Unity (a very poor excuse) while others find favour by trying new and innovative things on the desktop. Continue reading
Categories: កុំព្យូទ័រ
Leave a comment
Linux Deepin 2014 Release Candidate Available to Download
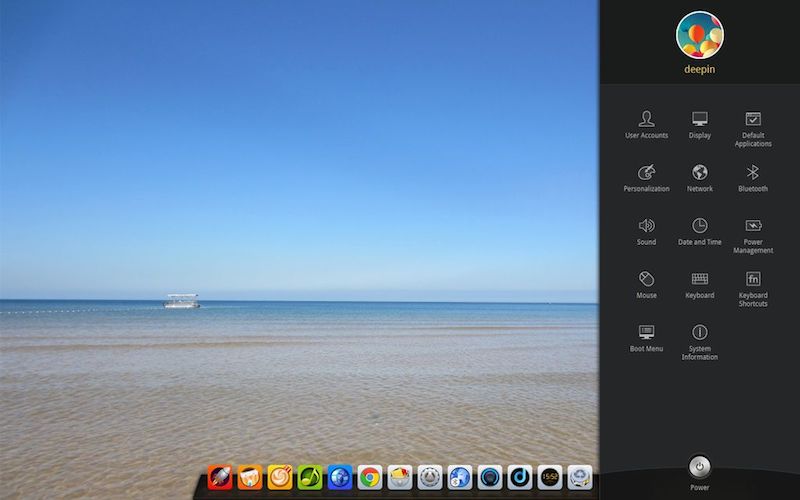
The first release candidate of the Ubuntu 14.04 based ‘Deepin’ Linux distribution has been made available to download. Continue reading
Categories: កុំព្យូទ័រ
Leave a comment
KDE Plasma 5 Arrives with Fresh New Look, True Convergence
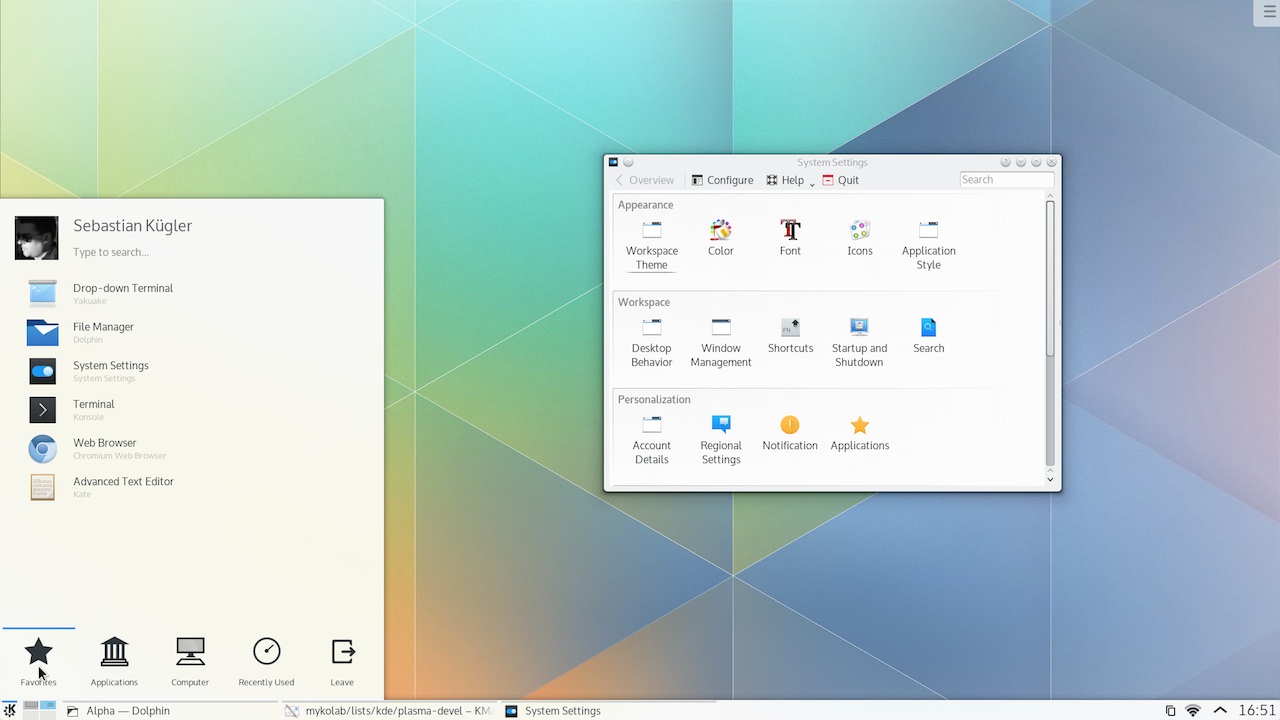
KDE has announced the first release of Plasma 5, a major reworking of the KDE desktop. Continue reading
Categories: កុំព្យូទ័រ
Leave a comment
Firefox 31 Arrives With New Tab Search Box and Malware Scanning

A new stable release of Mozilla Firefox, version 31, has been made available for download, and contains a modest set of changes.
The most visible and user-facing of these is the introduction of a search bar on the New Tab Page that sits above favourite site thumbnails. Like Chrome and Opera, this enables users to initiate searches from a new tab without using the omnibox. Continue reading
Categories: កុំព្យូទ័រ
Leave a comment
ក្តាចុចរបស់ Google ដែលមានលក្ខណៈងាយស្រួលសំរាប់វាយអក្សរខ្មែរ
ក្តាចុចមានច្រើនប្រភេទណាស់សំរាប់ឧបករណ៍ដែលដំណើរការដោយ Android OS។ ក្នុងចំណោមក្តាចុចទាំងនោះក៏មានក្តាចុចរបស់ Google ដែលចេញសាកល្បងនៅឡើយសំរាប់អ្នកប្រើប្រាស់។ ក្តាចុចរបស់ Google គឺបានចេញអោយសាកល្បងយួរហើយ តែដោយសារវាមានលក្ខណៈងាយស្រួលវាប្រើប្រហាក់ប្រហែល ក្តាចុចយោនីកួតខ្មែរដែល ដូច្នេះហើយបានជា itkhmer លើកឡើងសារជាថ្មីដើម្បីអោយអ្នកដែលមិនទាន់បានដឹង។
